Introduction
Every car owner knows the frustration of paying premium prices for car wash products that disappear after just a few uses. What if you could make your own car soap diy formula right at home — one that cleans just as effectively, costs a fraction of the price, and is gentle enough to protect your paint job? The good news is, you absolutely can.
Making a car soap diy blend is easier than most people think. With a handful of affordable ingredients found at any grocery store or pharmacy, you can whip up a powerful cleaning solution in minutes. Whether you drive a daily commuter, a weekend sports car, or a family SUV, a homemade car soap diy recipe can be customized to match your specific needs.
This complete guide will walk you through everything you need to know — from understanding what makes an effective car soap diy formula, to step-by-step recipes, ingredient breakdowns, safety tips, and expert tricks for getting a professional-quality shine at home.
Why Make Your Own Car Soap DIY Formula?
Before jumping into the recipes, it helps to understand why so many car enthusiasts are ditching store-bought products in favor of a homemade car soap diy solution.
1. Cost Savings
Commercial car wash soaps can cost anywhere from $10 to $40 per bottle. A good car soap diy recipe, on the other hand, can cost less than $2 per batch — and you likely already have most of the ingredients at home. Over the course of a year, the savings add up to well over a hundred dollars.
2. Ingredient Transparency
When you make your own car soap diy mixture, you know exactly what’s going into it. No mystery chemicals, no hidden solvents, no synthetic fragrances that might irritate your skin or damage your car’s clear coat. Every ingredient is chosen by you, for your car.
3. Customizable Formulas
Commercial car soaps are made for the average vehicle under average conditions. But your car isn’t average — it has specific paint, a specific finish, and specific cleaning needs. A car soap diy recipe lets you adjust the formula to suit your car perfectly, whether you need extra degreasing power, a gentle suds-free wash, or a formula safe for matte finishes.
4. Environmental Benefits
Many store-bought car wash soaps contain phosphates, petroleum-derived surfactants, and other chemicals that are harmful to aquatic environments when they run off into drains. A natural car soap diy recipe lets you use biodegradable, eco-friendly ingredients that are gentler on the planet.
What Makes a Good Car Soap DIY Recipe?
Not all DIY cleaning solutions are safe for cars. Dish soap, for example, is a common mistake — it strips protective wax and sealants from your paint. A proper car soap diy formula needs to balance several qualities:
- Mild surfactants that lift dirt without stripping wax or sealant
- Lubricating agents that help your wash mitt glide over the surface without causing micro-scratches
- pH-neutral or slightly acidic formula to protect clear coat
- Foaming ability to encapsulate dirt particles before they contact the paint
- Rinsability so it washes off cleanly without leaving residue
With these principles in mind, let’s get into the actual car soap diy recipes.
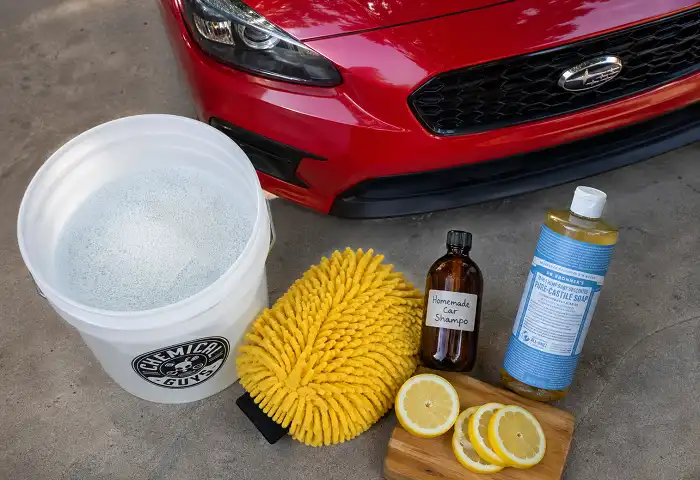
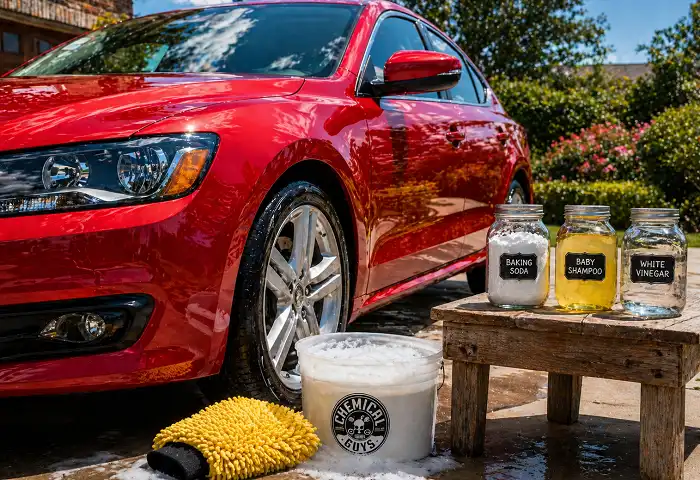
Recipe #1: The Classic Car Soap DIY Formula (All-Purpose)
This is the most popular car soap diy recipe for a reason — it’s simple, effective, and safe for most paint types including clear-coated factory finishes.
Ingredients:
- 1 gallon of warm water
- ½ cup of baby shampoo (tear-free, gentle formula)
- 2 tablespoons of baking soda
- 1 tablespoon of white vinegar
- Optional: 5–10 drops of lemon essential oil (for fresh scent)
Instructions:
- Fill a clean bucket with one gallon of warm (not hot) water.
- Add the baby shampoo slowly to avoid excessive sudsing.
- Stir in the baking soda and white vinegar. The mixture will fizz slightly — this is normal and beneficial.
- Add essential oil if desired.
- Mix gently and use immediately.
Why it works: Baby shampoo is gentle enough for the most sensitive finishes while still being an effective surfactant. Baking soda provides mild abrasive and deodorizing properties. White vinegar adds a touch of acidity that helps dissolve mineral deposits and road grime without harming your clear coat.
Best for: Weekly washes, daily drivers, vehicles with factory paint.
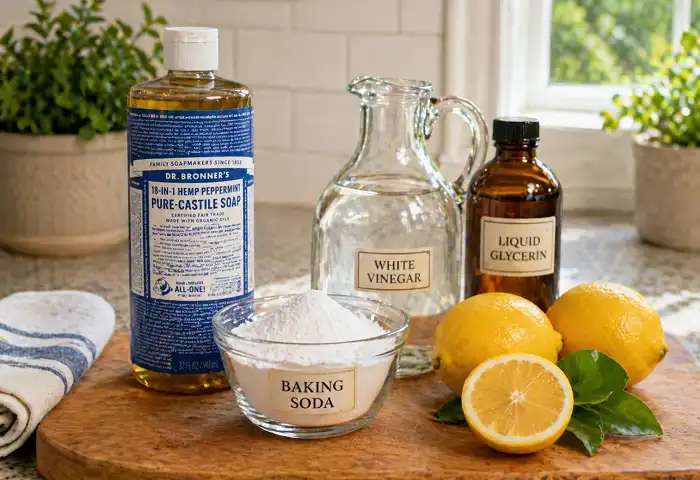
Recipe #2: Heavy-Duty Car Soap DIY Degreaser Blend
If you drive on rural roads, haul equipment, or your car picks up heavy grease and tar, you need a stronger car soap diy formula. This recipe has extra degreasing power without being harsh on paint.
Ingredients:
- 1 gallon warm water
- ¼ cup castile soap (unscented)
- 2 tablespoons liquid glycerin
- 1 tablespoon rubbing alcohol (70%)
- 1 teaspoon cream of tartar
Instructions:
- Combine all ingredients in a large bucket.
- Stir gently until the cream of tartar is fully dissolved.
- Apply with a soft microfiber wash mitt using the two-bucket method.
- Rinse thoroughly with clean water.
Why it works: Castile soap is a plant-based cleaner derived from olive oil — it’s powerful against grease but doesn’t strip wax. Glycerin adds lubrication to protect paint from scratches. Rubbing alcohol dissolves tar and tree sap. Cream of tartar helps lift stubborn oxidation and light staining.
Best for: Trucks, SUVs, vehicles exposed to heavy road grime, bug splatter, or tar.
Recipe #3: Waterless Car Soap DIY Spray Formula
Sometimes you just want a quick wipe-down without a full wash. This car soap diy waterless formula is ideal for light dust, fingerprints, and minor surface dirt.
Ingredients:
- 2 cups distilled water
- ½ cup isopropyl alcohol (99%)
- 1 tablespoon liquid carnauba wax (available at auto stores)
- 1 teaspoon baby shampoo
- 5 drops of your preferred essential oil
Instructions:
- Combine all ingredients in a clean spray bottle.
- Shake gently before each use.
- Spray onto a small section of the car and wipe with a microfiber cloth in straight-line motions.
- Buff with a clean, dry microfiber for a streak-free finish.
Why it works: The alcohol lifts and evaporates light contamination. Baby shampoo provides surfactant action. Liquid carnauba wax leaves behind a protective layer that enhances shine and repels future dust. Distilled water prevents mineral spots.
Best for: Quick touch-ups between full washes, cars kept in garages, show cars, or lightly-used vehicles.
Recipe #4: Car Soap DIY for Matte Finish Vehicles
Matte and satin finishes require special care — they cannot tolerate wax, high-gloss agents, or harsh chemicals. This gentle car soap diy recipe is specifically formulated for non-glossy paint.
Ingredients:
- 1 gallon distilled water
- ⅓ cup unscented castile soap
- 1 tablespoon vegetable glycerin
- No vinegar, no wax, no baking soda
Instructions:
- Mix castile soap and glycerin into distilled water.
- Stir slowly to avoid over-sudsing.
- Wash using gentle, straight-line strokes — never circular motions.
- Rinse with low-pressure water.
- Pat dry with a clean microfiber towel rather than wiping.
Why it works: Matte finishes are textured and porous. Any product that fills pores (like wax) will create unwanted glossy spots. This formula cleans without coating, preserving the intentional flat appearance of the finish.
Best for: Matte wrapped vehicles, satin paint, flat factory finishes.
Essential Tools to Use With Your Car Soap DIY Formula
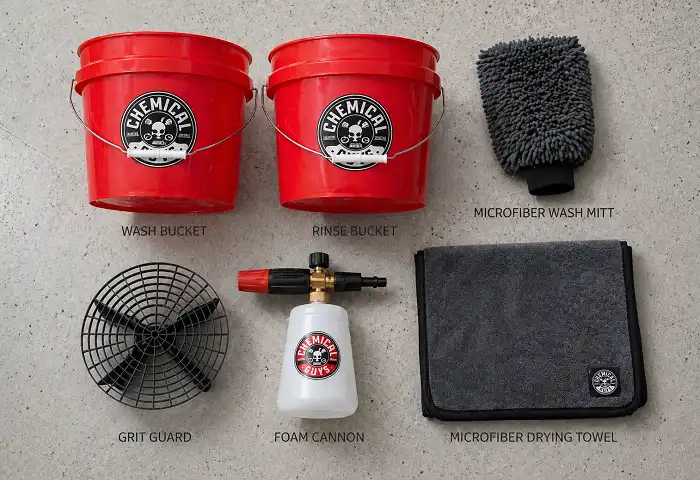
Even the best car soap diy formula won’t deliver great results without the right application tools. Here’s what you need:
Microfiber Wash Mitts
The single most important tool for a scratch-free wash. Traditional sponges can trap dirt particles and drag them across your paint. Microfiber mitts have thousands of fibers that lift and hold particles away from the surface.
Two-Bucket System
One bucket holds your car soap diy solution, the other holds clean rinse water. After each panel, rinse your mitt in the clean bucket before re-loading it with soap. This prevents you from reintroducing dirt to your paint.
Grit Guards
Place these plastic grid inserts at the bottom of each bucket. Dirt that falls from your mitt settles below the guard, preventing you from picking it back up.
Foam Cannon (Optional)
If you have access to a pressure washer, a foam cannon lets you apply your car soap diy formula as a thick, clinging foam that pre-soaks dirt before you even touch the paint. This significantly reduces the risk of scratching.
Microfiber Drying Towels
Regular towels can leave swirl marks. Use large, plush microfiber drying towels and pat or drag gently across the surface rather than rubbing aggressively.
Common Mistakes When Making a Car Soap DIY Recipe
Even well-intentioned car owners make these mistakes when mixing their first car soap diy batch. Avoid them and your results will be dramatically better.
Using dish soap: This is the #1 mistake. Dish soap is designed to strip grease — including the protective wax coating on your car. A few washes with dish soap and your clear coat protection is gone.
Using too much soap: More soap doesn’t mean more cleaning power. Excess surfactant is hard to rinse off and leaves streaky residue. Stick to the ratios in your car soap diy recipe.
Using hot water: Very hot water can warp plastic trim and cause water spots to set faster. Warm water is ideal — it opens up dirt particles without causing heat damage.
Washing in direct sunlight: Your car soap diy formula will dry on the surface before you can rinse it off, leaving water marks and soap spots. Wash in shade or during the cooler parts of the day.
Skipping the pre-rinse: Always rinse the car with clean water before applying your car soap diy solution. This removes loose surface dirt and prevents large particles from scratching the paint during the wash.
How to Get a Showroom Shine After Using a Car Soap DIY Formula
The wash is just the beginning. Follow these steps after using your car soap diy solution for a professional-quality result:
- Rinse completely — work from top to bottom, making sure all soap is removed.
- Dry immediately — don’t let the car air dry, as water spots will form.
- Clay bar treatment (monthly) — removes embedded contamination that soap can’t reach.
- Apply wax or sealant — protects the clean surface and enhances gloss. This step replaces anything stripped during washing.
- Polish if needed — for older vehicles or light swirl marks, a light polish before waxing restores depth of color.
Storing Your Car Soap DIY Formula
Most car soap diy recipes should be used fresh for best performance, but some can be stored:
- Water-based formulas (Recipes #1 and #2): Use within 24–48 hours. Bacteria can grow in standing soapy water.
- Spray formulas with alcohol (Recipe #3): Can be stored in a sealed spray bottle for up to 2 weeks.
- Matte formula (Recipe #4): Make fresh each time for best results.
Always store in a clean, labeled container away from direct sunlight and out of reach of children.
Is a Car Soap DIY Formula as Good as Commercial Products?
This is the question everyone asks. The honest answer is: yes, in most cases — especially for regular maintenance washes. High-end commercial car soaps may contain proprietary surfactant blends that offer slightly better lubrication or longer-lasting foam, but for the vast majority of car owners, a well-made car soap diy formula delivers completely comparable results.
The real advantage isn’t just in the cleaning power — it’s in the control, cost savings, and peace of mind you get from knowing exactly what’s touching your paint.
Professional detailers often use simple, ingredient-transparent formulas themselves. The detailing industry’s most respected figures regularly advocate for less-is-more approaches to car care chemistry.
Final Thoughts
Making your own car soap diy solution is one of the smartest things a car owner can do. It saves money, reduces chemical exposure, lets you tailor your formula to your specific vehicle, and — done right — delivers results that rival anything you’d find on a store shelf.
Start with Recipe #1 for your everyday wash needs. Upgrade to Recipe #2 for the dirty seasons — winter road salt, summer bug season, muddy autumn weekends. Keep Recipe #3 in your glove box for touch-ups on the go. And if you’re lucky enough to own a matte-finish vehicle, Recipe #4 is your new best friend.
The world of car soap diy is surprisingly deep and rewarding. Once you experience the satisfaction of a hand wash with your own formula and see that clean, glossy, protected finish in the sun, you’ll wonder why you ever bought a bottle of commercial soap at all.
Clean car, happy driver — and it all starts with a bucket, some simple ingredients, and a little knowledge.